Bridle A Horse - Page 1 of 2
Bridle your horse easily and safely using our step-by-step photos!
Please be sure to read the common sense safety precautions at the bottom of this page.
Putting On A Bridle
First of all, when you're bridling a horse it's important to understand there is an area in every horse's mouth known as the "interdental space." The interdental space is an area, both on the upper and lower jaws, where there is not any teeth.
This area is between the front teeth (the incisors) and the back teeth (the molars). When a horse is bridled, the interdental space is where the bit rests. On the bottom jaw, most horsemen refer to this area of bare gums as the "bars."
Below: The blue arrows are pointing to the interdental space.
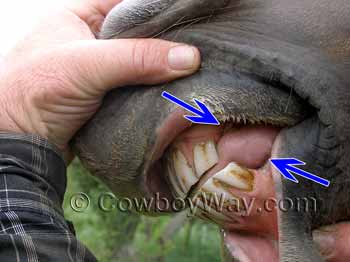
The interdental space is not only the area in a horse's mouth where the bit rests, it is a safe place for a person to insert their thumb to ask the horse to open its mouth to accept the bit during the bridling process (this will be illustrated in step three on the next page).
Removing The Halter
While some people ride their horse with the bridle over the halter, we're going to remove it. When you remove the halter, you will still need to maintain control over the horse.
- When you remove the halter, you can put it out of the way and let your horse stand ground tied. This is our personal favorite method.
- If your horse doesn't ground tie you can remove the halter, put it out of
the way, and use the reins of the bridle around the horse's neck to maintain
control:
- If the reins are split reins you can take the off-side rein (ie, the right side rein), pass it under the horse's neck, then lay it over the top of the neck. Lay the left rein across your left arm or shoulder.
- If the reins are a one piece rein (often called a "roping rein")
you can unbuckle them from the left side of the bit, pass them under the
horse's neck, then lay them over the top of the neck.
- Note: Before a horse is bridled do NOT slip a solid rein (like a mecate or a roping rein that is still buckled to both sides of the bit) over the horse's head and onto the neck. If the horse should move away and you lose control, the reins will hold the loose and now freely-swinging headstall close to the horse, providing a trap for them to step in to.
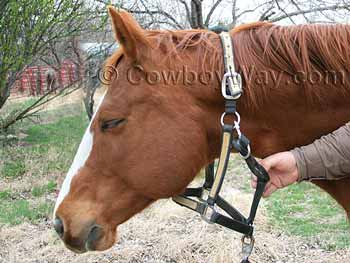
- You can also remove the halter, then re-buckle it around the horse's neck. You can let the lead rope fall to the ground, or loosely lay it across your shoulder.
Below: This horse's halter has been removed and refastened around his neck.
Bridling, Step One
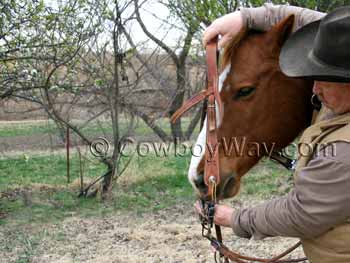
Holding the crown of the bridle in your right hand, place your right arm between the horse's ears. This will encourage the horse to drop its head, and will also put your right hand in a good place to lift and guide the bridle.
During bridling the horse should have its head at a naturally low head position, or lower if you've trained him to drop his head when asked. Trying to bridle a horse that has raised its head is awkward and can even get the handler off balance as they stretch to reach.
In addition, if a horse has its head raised it's easier to bang the teeth with the bit when you slip it into the horse's mouth, and you absolutely do NOT want that to happen. See more about this in the next step.
Below: Holding the crown of the bridle in your right hand, place your right arm between the horse's ears. This will encourage the horse to lower its head, and put you in a good position to guide the bridle.
Bridling, Step Two
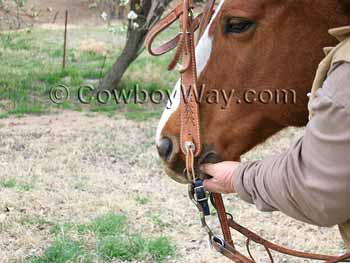
Use your left hand to place the bit at the horse's lips, and to move the curb strap (if the bridle has one) behind the horse's chin so it won't accidentally slip into his mouth.
During this step, do NOT bump or bang the bit into the horse's lips or front teeth. This is painful to the horse which is not only unkind, it may also cause the horse to react by flinging its head, possible whacking you in the face and causing serious injury. Repeatedly bumping the horse in the lips or front teeth with the bit during bridling could (understandably) cause the horse to become hard to bridle.
Below: The bridle in this photo is a Western style that has a curb bit and a curb strap. Other styles of bridles and bits may not have a curb strap.
Think Safety!
Even a small horse is a large and powerful animal. During the bridling process, the person doing the bridling can easily be injured. It is common sense to take a few, easy safety precautions to avoid injury.
- If it is fly season, consider applying fly spray to the horse. During bridling you will need to stand very close to the horse's head and front legs. If the horse is fighting flies you could be stepped on or hit in the face by the horse's head.
- Don't cause the horse pain or discomfort during bridling. In addition to simply being wrong to mistreat a horse, causing one pain or discomfort is also a safety hazard. A horse reacting to pain in the face or mouth area is likely to quickly and powerfully move its head, possibly hitting anyone nearby in the face and causing serious injury. The two main ways people accidentally hurt a horse while bridling it is to bump its lips or teeth with the bit, and to smash its ears.
- Saddle first, bridle last. When getting ready to go for a ride, saddle the horse first then put the bridle on just as you are ready to ride. This way, the horse can remain tied up with a halter and lead rope while you are saddling. Halters and lead ropes are the proper equipment to tie a horse with, not bridles.
How To...
… Care For Your Felt Cowboy Hat
… Care For Your Saddle Pad Or Blanket
… Close A Gate With A Chain Latch
… Estimate Cattle Age By Their Teeth
… Fishtail Braid Your Horse's Tail
… Make A Bridle Rack Out Of Tin Cans
… Make A Collapsible Wood Saddle Rack
… Make A Flag Boot Out Of A Horn
… Make Homemade Hoof Conditioner
… Make Homemade Horse Fly Spray
… Measure A Western Saddle Seat
… Put A Horn Knot On Your Rope
… Put A Speed Burner On A Honda
… Recognize Common Horse Colors
… Recognize Common Horse Face Markings
… Stop A Saddle From Squeaking
… Tell A Boy Cow From A Girl Cow
… Tell A Horse Skull From A Cow Skull
… Tie A Stopper Knot
Tie a stopper knot for the end of a rope, or a metal, rawhide, or plastic honda
… Tie A Stopper Knot For A Honda
Tie a stopper knot for a tied honda
… Understand Leather / Hide Thickness
… Weigh A Horse and Optimize Rider Weight
… Wrap A Saddle Horn With Rubber
You Might Also Like...
