How To Take Horse Pictures - Page 1 of 2
As we all know, there's a difference between a horse picture and a beautiful horse picture.
We have some simple and easy guidelines to help anyone take better photos of their horse. You'll also find a lot of example photos of good and bad horse pictures.
You are on page one. This page includes:
- Fill The Frame
- Leading Space
- Ears Up
- Be Careful With Forward Angles
- Feet Close To Square
- Center, Off Center, Or Rule Of Thirds
- Use The Viewfinder
- Use Burst Mode and Auto Focus
Find more great tips for taking horse pictures on page two.
Fill The Frame
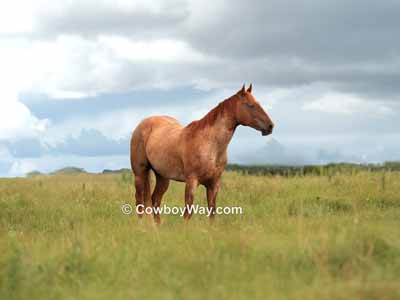
Fill the frame! When you look through your camera's viewfinder, your main subject (which, in this case, is your horse) should be the most prominent object that you're seeing.
Below: In this photo the horse is overwhelmed by the pasture and sky.
To fill the frame:
- Move closer to your subject.
- Use the camera's zoom.
- Crop the photo: If you simply can't fill the frame with your subject, you may want to go ahead and take the shot, but then crop the picture later so that the main subject fills the photo. In fact, many professional photographers feel that most photos benefit from at least a little cropping.
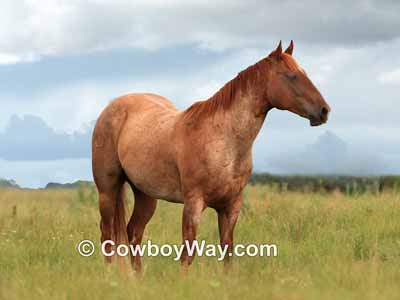
Below: Much better! In this photo the photographer used the zoom and also cropped the picture after it was taken.
Leading Space
FYI: "Leading space" is also sometimes called "leading white space," "the rule of space," or "negative space."
Some photos look great with the subject centered. Others, however, benefit from having at least a little leading space.
"Leading space" is the empty space in front of the area where the subject in the photo is facing. When we say "empty" space we mean a part of the photo that has content, but that content doesn't take attention away from the subject.
If there isn't enough leading space, our mind often considers the photo to be cramped. It's almost as if we imagine the subject bonking against the edge of the photo because there isn't enough room.
This is true for still photos and action shots.
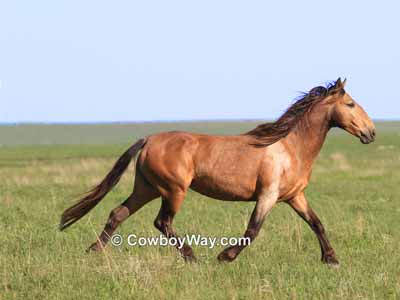
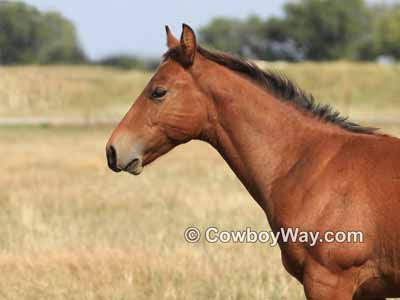
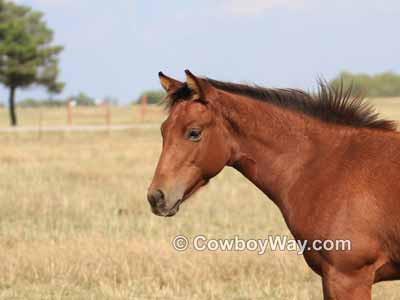
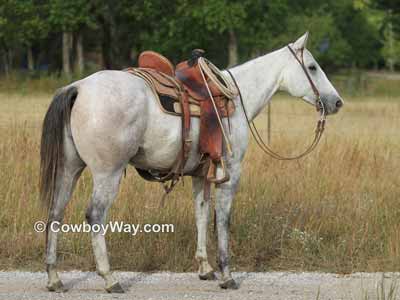
Below: This horse picture doesn't have any leading space. It looks as though the horse is going to trot off the image, or bonk his nose on the edge.
Below: A horse portrait with leading space in front of the subject. The leading space helps this image feel more pleasing to the viewer.
Ears Up
Ears up! A picture of a horse with its ears back, down, or to the side (lazy ears) is unflattering to any horse.
Unless you are specifically capturing a horse's emotions where the ears' being back, down, or lazy is appropriate, you will want to make sure the ears are up.
The photos below were taken only minutes apart. There is no question the filly looks better in the second picture where her ears are up.
Below: A filly with lazy ears.
Below: With her ears up, the filly looks so much nicer.
Be Careful With Forward Angles
Forward angles in horse photography can make a very pleasing photo.
However, you have to be careful with forward angles. Why? The wrong forward angle can make the entire front end of the horse appear overly large and out of proportion. It can also make the head appear unattractive.
In addition, the wrong forward angle makes it difficult to see any definition in the horse's body.
If you take a forward angle shot, be cautious about the angle and how it makes the horse appear in the completed photo.
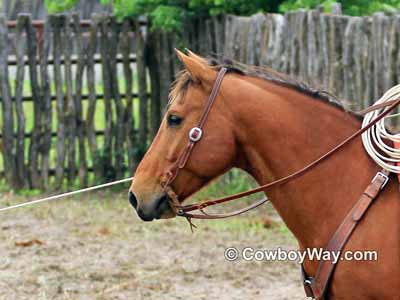
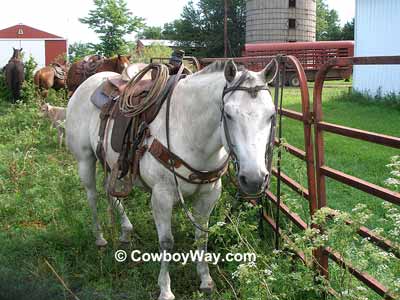
The photo below was taken from an unflattering forward angle.
- The angle is causing the front end of the horse to look out of proportion to the rest of its body.
- In addition, the angle is obscuring the horse's body, and very little of the body can be seen well.
Note: There's also a lot of distracting clutter behind the horse, but we'll get to that later.
Below: A horse photo from an unflattering forward angle.
Below: Much better! This photo was also taken from a forward angle, but the horse looks very nice.
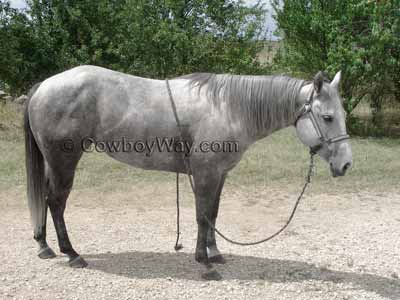
Feet Close To Square
If the photo is of a horse standing still, it's usually most flattering for the horse to be standing with its front feet "square." This means the front feet should be even with one another, or close to it.
However, the horse's back feet do not have to be exactly square. Horses often stands with their back feet slightly uneven, and this can look natural and flattering in many photos.
Below: This horse is standing close to square in the front. The back feet are not square, but the horse looks natural and comfortable.
Center, Off Center, Or Rule Of Thirds
In some cases a horse centered in the photo can make a very pleasing picture. However, off-center framing can be perfect for some shots.
For example, capturing a bronc at a rodeo in a moment of exciting action, a little off center so you can see the reaction of the crowd in the stands, may make a good picture even better.
The Rule Of Thirds
In addition to center and off center, using the "rule of thirds" when composing your image can also make a pleasing photo. In fact, the rule of thirds is a favorite technique frequently used by photographers.
So, what is it?
In photography, the rule of thirds divides the photo into 3 equal sections both horizontally and vertically. According to the rule, the human eye is naturally drawn to the imaginary lines that make up these sections.
This is a LOT simpler than it sounds! See the image below.
In addition, the places where the imaginary lines intersect create areas that are particularly powerful in drawing the viewer's attention. These are often called "power points."
Below: The red lines illustrate the imaginary lines that make up the rule of thirds. The small circles illustrate where the lines intersect, aka the power points.
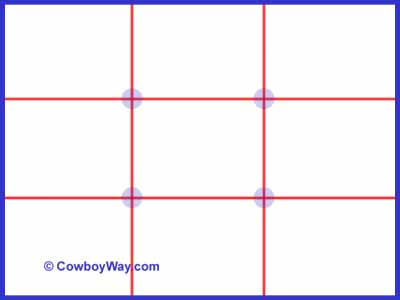
Above: According to the rule of thirds, the human eye is naturally drawn to objects that fall along the imaginary lines or at the power points.
Below is a photo of a filly with the imaginary rule of thirds lines superimposed on top. Note that her topline follows along the highest horizontal line, and that her face falls at a power point.
Below: A photo composed using the rule of thirds.

The rule of thirds is a very popular composition technique in photography. Many cameras have a set of gridlines representing the rule that can be turned so you can seem them when you are composing your photo.
In addition, many photo editing software products have a rule of thirds gridline that you can turn on and use when cropping your photos.
The Rule Of Thirds Is Great, But...
Rules are meant to be broken. As much as we love the rule of thirds there are times it just doesn't work for a photo.
In addition, the photographer is free, creatively and artistically, to compose a photo any way they choose. It helps many of us to keep the rule of thirds in mind when composing photos, but in the end it's our choice to use it or break the "rule."
Use The Viewfinder
If your camera has a viewfinder, use it to look through and compose your image instead of the the LCD screen.
Why?
- With some models of digital cameras, the viewfinder responds much more quickly after you press the shutter button than the LCD screen. The quicker response can be enough time to take another photo that would be missed if you were using the LCD screen.
- In many lighting conditions the viewfinder gives you a much clearer view of the image you're composing. LCD screens tend to show glare or render colors poorly.
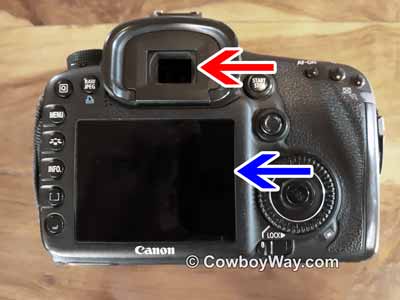
Below: The red arrow is pointing to this camera's viewfinder. The blue arrow is pointing to the LCD screen.
While cameras with viewfinders are not as common now as they have been in the past, they are still available.
Use Burst Mode and Auto Focus
Even if you just want a single picture, use "burst mode" (also known as "continuous shooting") along with auto focus.
- Burst mode, in case you're not familiar with it, is when you press and hold the shutter button and the camera takes several photos in rapid succession.
- Burst mode has different names in different camera settings. Refer to your user manual to find what it's called on your camera.
When taking horse photos, burst mode and auto focus are often praised as great features for taking action shots. However, they're also a huge asset for capturing still images.
Why is that? It's because things can change very quickly.
For example, in the fraction of a second a horse may flick its ears, stomp its foot, or swish its tail, then return to a nice stance just a moment later. With burst mode, your chances of catching the good moments go up, and you can simply delete the bad ones.
And, if you're also using auto focus, you won't have to re-focus yourself. Re-focusing manually can be time consuming. When you're photographing live subjects, like horses, pausing to re-focus can frequently cause you to take out-of-focus photos.
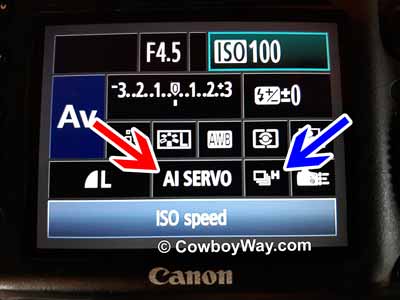
Below: A Canon camera showing the auto focus setting (red arrow; called "AI Servo" on this camera) and burst mode (blue arrow; called "high-speed continuous shooting" on this camera).
How To...
… Care For Your Felt Cowboy Hat
… Care For Your Saddle Pad Or Blanket
… Close A Gate With A Chain Latch
… Estimate Cattle Age By Their Teeth
… Fishtail Braid Your Horse's Tail
… Make A Bridle Rack Out Of Tin Cans
… Make A Collapsible Wood Saddle Rack
… Make A Flag Boot Out Of A Horn
… Make Homemade Hoof Conditioner
… Make Homemade Horse Fly Spray
… Measure A Western Saddle Seat
… Put A Horn Knot On Your Rope
… Put A Speed Burner On A Honda
… Recognize Common Horse Colors
… Recognize Common Horse Face Markings
… Stop A Saddle From Squeaking
… Tell A Boy Cow From A Girl Cow
… Tell A Horse Skull From A Cow Skull
… Tie A Stopper Knot
Tie a stopper knot for the end of a rope, or a metal, rawhide, or plastic honda
… Tie A Stopper Knot For A Honda
Tie a stopper knot for a tied honda
… Understand Leather / Hide Thickness
… Weigh A Horse and Optimize Rider Weight
… Wrap A Saddle Horn With Rubber
You Might Also Like...
