How To Whiten Bone
On this page we show you how we took a stained, dingy cow skull and cleaned it to a nice, bright white.
Here at CowboyWay.com we've always taken the patient approach to whitening the bone of a cow skull: We allow nature to take its course and do the work for us. By allowing a fresh skull to be exposed to insects and sunshine the bone of the skull is slowly but surely cleaned to a nice, bright, white with little or no work from us.
We've used this patient approach numerous times over the years with excellent results.
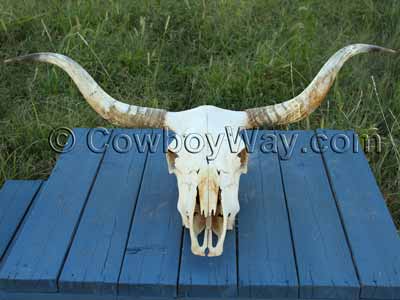
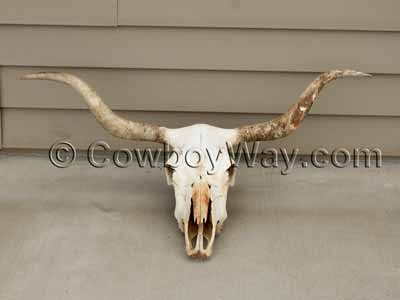
The skull in this article, though, presented a new challenge for us. This particular skull was submerged in a pond for about a year before we could retrieve it. When we could finally get to it, the bone had large areas of brown and black stains.
Below: The "after" photo. Prior to being whitened, the bone of this skull had large areas of brown and black stains.
Since we knew that hydrogen peroxide is widely used to whiten bone we decided to give it a try on our cow skull. We had used hydrogen peroxide several years earlier to whiten a small bone with good results, but we had never used it on something as large as a cow skull.
In the text and photos below we'll show you the steps we took and the results we achieved.
Whitening The Bone Of A Cow Skull
Below is a photo of the skull before we whitened the bone. We considered immersing the entire skull in a container of hydrogen peroxide but didn't have a container large enough. Even if we were able to find a suitable container, we wanted to avoid the expense of buying enough hydrogen peroxide to fill it.
So, instead of immersing the skull, we decided to wrap it in white cloth soaked with hydrogen peroxide, then cover it with plastic wrap and a garbage bag to keep the peroxide from running off or evaporating.
A cow skull with stains and the items we used to whiten it.
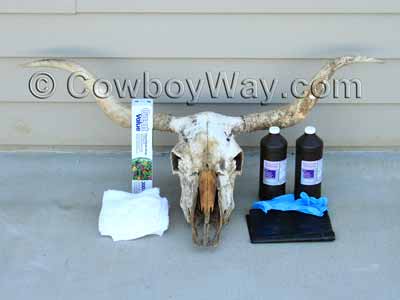
Shown in the photo above is a list of the items we used:
- To the left of the skull
- Clear plastic wrap, the kind you use in the kitchen. We used a generic brand purchased at our local discount store.
- White towels. Why white? Hydrogen peroxide can have a bleaching effect on colored fabrics. Therefore, it might not only remove the color from colored towels, the color might seep into the bone of your skull.
- To the right of the skull
- Two, 1-quart bottles of 3% hydrogen peroxide. We wound up only using one bottle. When working with hydrogen peroxide we suggest you read the label and follow all precautions.
- Blue rubber gloves to wear while working with the peroxide.
- A black, 50-gallon garbage bag. We used a heavy-duty bag so the tips of the horns wouldn't poke holes in it.
You might like these items. Or, Article continues below.
Wrapping The Bone
The first thing we did was slide off the outer shells of the horns and lay them aside. This served two purposes: 1) It decreased the overall width of the skull and made it easier to work with, and 2) The outer shells of the horn are made of keratin, not bone, and we didn't want to get hydrogen peroxide on them.
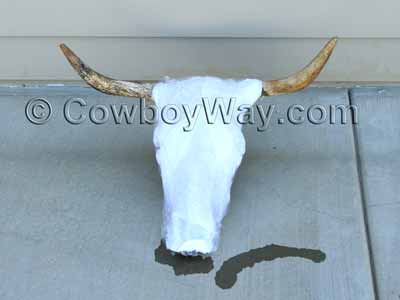
Next, we wrapped the bone of the skull in white towels, then poured 3% hydrogen peroxide on the towels until they were saturated. Working quickly, we then covered the skull and towels with clear plastic wrap. We tried to get the skull sealed in the plastic wrap before too much of the hydrogen peroxide could run off.
Note: Even though the bone of the horns was stained like the rest of the skull, you can see in the photo that we didn't wrap them in hydrogen peroxide in order to whiten them. That's because we had the outer shells of the horns to place back over them when we were done, covering the stains.
Below: The cow skull covered in white towels soaked with hydrogen peroxide, then wrapped in clear plastic kitchen wrap.
If you didn't know that horns were made up of two components,
bone and keratin, you can see our article on that here:
Cow horns..
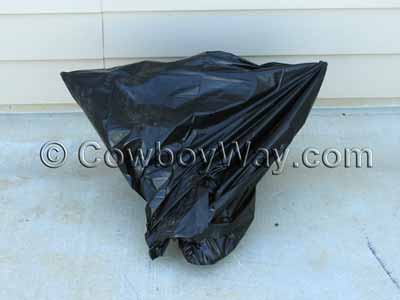
Next, we put the skull into a black, heavy-duty, 50-gallon garbage bag, tied the bag closed, and set it outside in the sun. The skull was in the bag from 9:10am until 7:00pm, and the high temperature that day was 100 degrees Fahrenheit with strong sunshine all day.
At the end of the day we completely unwrapped the skull, rinsed it generously with water to remove all traces of hydrogen peroxide, then allowed it to air dry overnight.
This is the result after the first day. (Note that we put the outer shells of the horns back on for the photo.)
The skull is much whiter and we were quite pleased with the initial results. However, we did want a bit more whitening, particularly in the area on the nasal bone.
To get a little more whitening we once again removed the outer shells of the horns, covered only the still-brown areas of the bone with white towels, saturated the towels with 3% hydrogen peroxide, then wrapped the entire skull in plastic wrap and put it back into the garbage bag.
This time the skull was wrapped from 8:30am to 6:00pm with a high temperature that day of 92 degrees Fahrenheit. The morning was partly cloudy with strong sunshine all afternoon. When we unwrapped the skull that evening we rinsed it thoroughly with water, making sure to remove all traces of hydrogen peroxide, and allowed it to air dry.
Whitened Bone - The Results
After a second day of whitening treatments we liked the results we achieved. They can be seen in the photo below. We would suspect that one or more additional treatments with hydrogen peroxide would whiten the brown area on the nasal bone further, but we liked the results as they were and chose not to attempt additional whitening.
Pictured with the skull are the items we used to finish getting it ready for display. These are itemized below.
Below: The whitened bone of our cow skull. Also shown are the items we used to finish getting the skull ready for display.
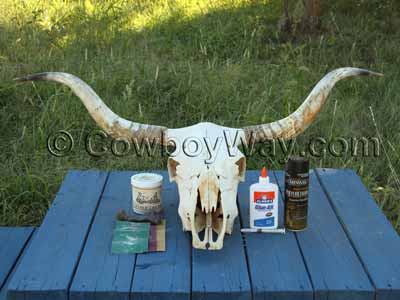
- To the left of the skull:
- Skidmore's Leather Cream.
- Steel wool.
- Coarse, medium, and fine sandpaper.
We used the sandpaper and steel wool to sand the outer shells of the horns. We didn't sand them a lot, just enough to remove the dark, dirty patches and smooth them up a little. When we were done sanding we rinsed them off, allowed them to air dry, then put on a light coat of Skidmore's Leather Cream.
- To the right of the skull:
- A bottle of Elmer's glue.
- A 3 cc syringe with a 16 gauge, 1 inch needle.
- A can of spray polyurethane.
Since the teeth in the skull were loose, we used the glue to help set the teeth. We removed the plunger from the syringe, squirted the glue in, then replaced the plunger. We then inserted the needle into any gaps we could find around the teeth and filled them with glue.
When the glue had set we sprayed several light coats of polyurethane over the entire skull to help seal it and to prevent dust from settling into it, which could eventually give it a dingy look.
Parting Notes On Cow Skulls and Whitening Bone
- We used 3% hydrogen peroxide to whiten the bone of our skull because we were
unable to find a higher percentage available to us locally. While we could find
higher percentages for sale on the Web, the cost was higher and we
decided to use the 3%. It was available to us at our local discount store for
$1.00 per quart, and we only needed one quart for the skull in this article.
- We have heard that stronger percentages of hydrogen peroxide work more quickly to whiten bone, but we don't have any personal experience using higher percentages. The 3% hydrogen peroxide worked well for us, probably due in part to the help of the hot summer temperatures.
- When working with hydrogen peroxide of any strength read and follow all label precautions.
- We used white towels because hydrogen peroxide can have a bleaching effect on colored fabrics, similar to bleach. Hydrogen peroxide might not only remove the color from colored towels, the color might seep into the bone.
- Although we sealed the cow skull in this article with polyurethane, another method we like to use is to mix a white glue, such as Elmer's, in a 1:1 ratio with water, then paint the mixture onto the skull. We recommend only putting this mixture on bone, though, and not the outer shells of the horns (which is made of keratin), as this mixture might give them an odd whitish-cast.
- If you didn't know that horns were made up of two components, bone and keratin, you can see our article on that here: Cow horns.
- Does whitening the bone damage it? Yes. By some people's definition whitening bone by any method, including sunlight, is damaging to it. However, most of us have come to think of "pretty" bone as white bone, and a certain amount of whitening - whether it's done by Mother Nature or by us - is the look most of us prefer.
How To...
… Care For Your Felt Cowboy Hat
… Care For Your Saddle Pad Or Blanket
… Close A Gate With A Chain Latch
… Estimate Cattle Age By Their Teeth
… Fishtail Braid Your Horse's Tail
… Make A Bridle Rack Out Of Tin Cans
… Make A Collapsible Wood Saddle Rack
… Make A Flag Boot Out Of A Horn
… Make Homemade Hoof Conditioner
… Make Homemade Horse Fly Spray
… Measure A Western Saddle Seat
… Put A Horn Knot On Your Rope
… Put A Speed Burner On A Honda
… Recognize Common Horse Colors
… Recognize Common Horse Face Markings
… Stop A Saddle From Squeaking
… Tell A Boy Cow From A Girl Cow
… Tell A Horse Skull From A Cow Skull
… Tie A Stopper Knot
Tie a stopper knot for the end of a rope, or a metal, rawhide, or plastic honda
… Tie A Stopper Knot For A Honda
Tie a stopper knot for a tied honda
… Understand Leather / Hide Thickness
… Weigh A Horse and Optimize Rider Weight
… Wrap A Saddle Horn With Rubber
You Might Also Like...
