How To Make a Collapsible Wood Saddle Rack
Collapsible wood saddle racks are a handy accessory around any barn or stable.
Collapsible saddle racks made of wood like the one below are inexpensive, fast, and easy to make.
They can hold English or Western saddles, and when not in use are easily collapsed so that they're out of the way.
They're also portable: Just unhook them and take them anywhere you want.
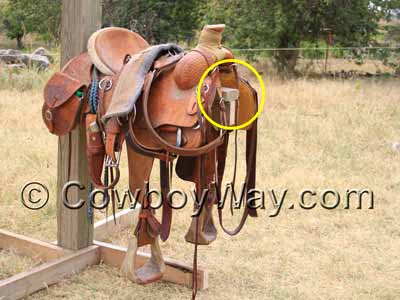
Below: A collapsible wood saddle rack ready for a saddle.

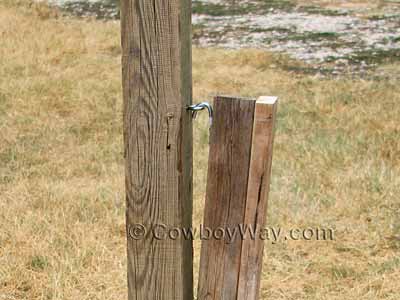
Below: Turn it over, and it collapses to fit neatly against a wall or post.
In the text and photos below we'll show you how to make a collapsible wood saddle rack suitable for hanging on any sturdy wood surface.
The Materials
To make a collapsible wood saddle rack like the one shown above you will need:
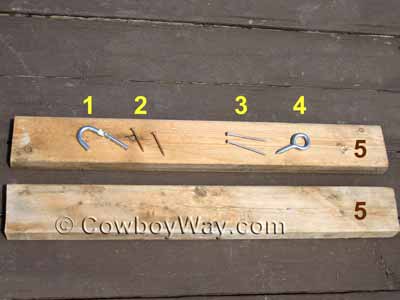
1 - A "J" hook, also called a tarp or rope hook. They are available in a variety of styles.
2 - Two screws for attaching the "J" hook. The screws we used were 1 1/2 inches long.
3 - Two more screws for screwing the two 2X4s (item #5) together. The screws we used were 3 inches long.
4 - An eye bolt, also called an eye hook, or a screw eye. The one we used cost us .92 cents at a local hardware store.
5 - Two 2X4 (2 inches wide X 4 inches tall) boards, cut to equal lengths (they should be long enough for your particular saddle). If necessary, sand the boards so they won't leave splinters in you or your saddle.
If you don't want to cut the 2X4s to the correct length yourself, many local hardware stores will cut them for you at no charge if you purchase the boards from them. Once again, if needed, sand the boards so they won't leave splinters in you or your saddle.
The 2X4s in the photos on this page are 27 inches long. We arrived at this length after measuring the length of our saddle.
Below: The materials to build a collapsible wood saddle rack.
You might like these items. Or, Article continues below.
Step One: Screw The Boards Together
Place one 2X4 on it's edge onto a work surface. Holding the second 2X4 so it is long-ways from side-to-side, center it across the top edge of the first 2X4.
The result should be the two 2X4s looking like a capitol letter "T."
Secure them together by placing one screw into each end (the screws we used for this were 3 inches long). See the photo below.
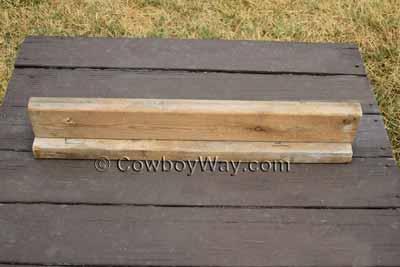
Below: Screwing one end of the boards together. Do the same thing at the opposite end.
Below: This should be the result after completing the step above. Notice that, compared to the photo above, we've turned the boards upside down.
Pressed for time? You can find collapsible, portable, wood saddle racks like the one on this page at Etsy.
Step Two: Insert The Eye Bolt
Set the two 2X4s you screwed together in step one off to the side. We'll get back to them shortly.
Next, turn your attention to the wood surface where you're going to mount your saddle rack. Since you're going to use an eye bolt to be the hanger for your saddle rack (which is the joined 2X4s we screwed together in step one), decide where you will screw the eye bolt into your mounting surface. Mark the spot with an "X."
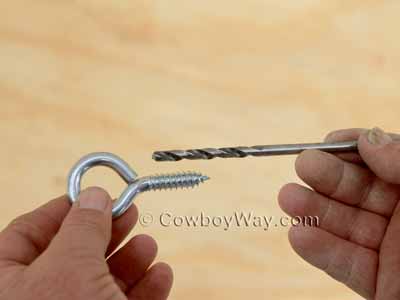
Now drill a pilot hole for the eye bolt where you made your X. Use a drill bit slightly smaller in diameter than the eye bolt.
Below: Comparing an eye bolt to the drill bit we're going to use. Notice that the drill bit is slightly smaller in diameter than the eye bolt.
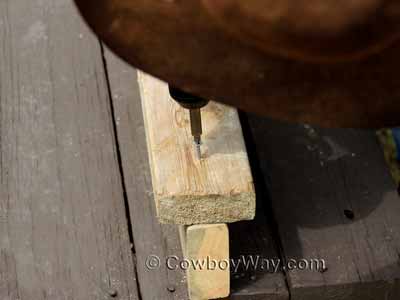
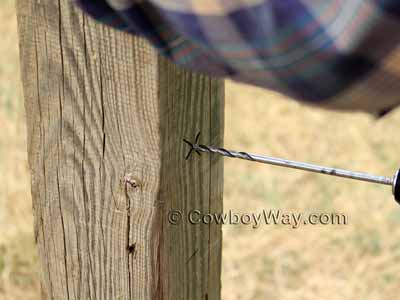
Don't drill the hole too deep. You only want the hole to be as deep as the stem of the eye bolt is long.
Below: Drilling a pilot hole.
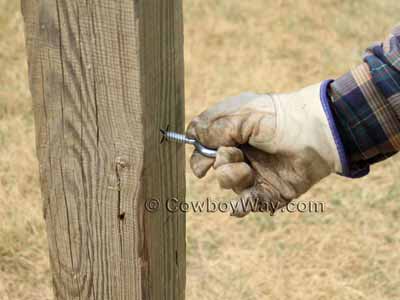
After the pilot hole has been drilled, begin screwing in the eye bolt. You can begin screwing it in by hand.
Below: Screwing in the eye bolt.
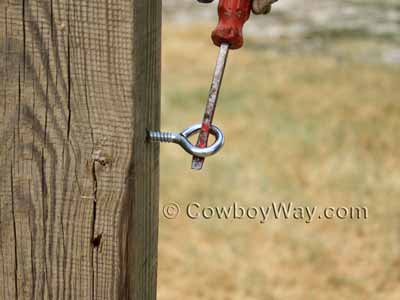
When screwing in the eye bolt by hand gets to be too hard to continue you can use a screwdriver for more leverage to help you finish.
Below: Using a screwdriver to finish screwing in the eye bolt.
Step 3: Attach The "J" Hook
After the eye bolt is screwed in, you're ready to move your attention back to the two 2X4s (which are now your saddle rack) that you screwed together earlier. We're now ready to attach the "J" hook to them, but first we need to mark the location.
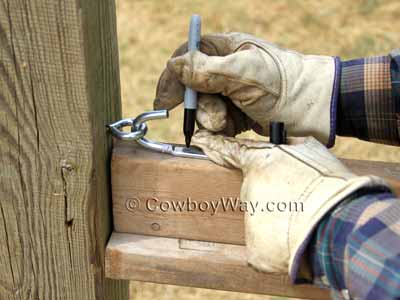
To find out where to attach the "J" hook to the joined 2X4s (aka, the saddle rack), place the "J" hook through the eye bolt you screwed into your mounting surface in step 2. See the photo below.
Next, hold the saddle rack (the joined 2X4s) underneath the "J" hook, also as shown below. Make sure the "J" hook is flat against the top of the saddle rack, and that the saddle rack is pushed firmly against the wall or post. Mark where to place the screws.
Below: Mark where to place the screws to attach the J hook.
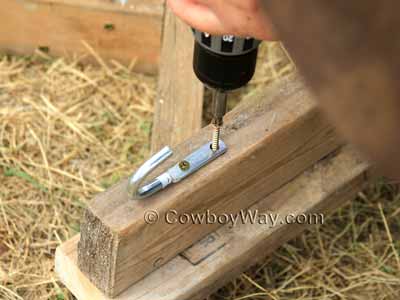
Then move the saddle rack and the "J" hook to a work surface and join them together with screws. The screws we used for this were 1 1/2 inches long.
Below: Attach the "J" hook with screws.
Your Collapsible Wood Saddle Rack Is Finished!
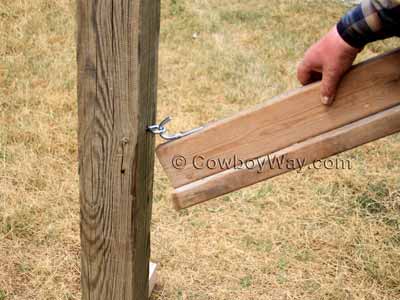
You're done! To use your saddle rack, hang it as shown below.
Below: Hang the completed wood, collapsible saddle rack.
To collapse your saddle rack when you're not using it turn it around and hang it the other way.
Below: The collapsed saddle rack.
This type of saddle rack is also portable. Just install eyebolts anywhere you want to hang it.
Wood Saddle Rack Options
While this style of saddle rack is pretty straight forward, there are at least a couple of common options you can choose from when making one.
For one option, you can put the "J" hook on the "skinny" 2X4 (the one on its edge). This is how we did it in the photos above. We also show it again in the photo below. This way makes the finished saddle rack look like an upside-down letter "T."
Below: Putting the "J" hook on the skinny 2X4 will make the finished saddle rack look like an upside-down letter "T."
Or you can put the "J" hook on the wide 2X4 (the one that's widest from side-to-side). This makes the finished saddle rack look like a right-side-up letter "T." See the next photo.
Below: Putting the "J" hook on the wide 2X4 will make the finished saddle rack look like a right-side-up letter "T."
For another option, you can use boards that are a different size than 2X4. While 2X4s are probably the most common size of board for this type of saddle rack, you can use bigger boards like 2X6s, or you can use one 2X4 and one 2X6.
Last but not least, you can paint the saddle rack any color(s) you like, and/or cover it with carpet to help keep your saddle from slipping.
How To...
… Care For Your Felt Cowboy Hat
… Care For Your Saddle Pad Or Blanket
… Close A Gate With A Chain Latch
… Estimate Cattle Age By Their Teeth
… Fishtail Braid Your Horse's Tail
… Make A Bridle Rack Out Of Tin Cans
… Make A Collapsible Wood Saddle Rack
… Make A Flag Boot Out Of A Horn
… Make Homemade Hoof Conditioner
… Make Homemade Horse Fly Spray
… Measure A Western Saddle Seat
… Put A Horn Knot On Your Rope
… Put A Speed Burner On A Honda
… Recognize Common Horse Colors
… Recognize Common Horse Face Markings
… Stop A Saddle From Squeaking
… Tell A Boy Cow From A Girl Cow
… Tell A Horse Skull From A Cow Skull
… Tie A Stopper Knot
Tie a stopper knot for the end of a rope, or a metal, rawhide, or plastic honda
… Tie A Stopper Knot For A Honda
Tie a stopper knot for a tied honda
… Understand Leather / Hide Thickness
… Weigh A Horse and Optimize Rider Weight
… Wrap A Saddle Horn With Rubber
You Might Also Like...
